


Customer Intake
Accessing DBA FACS Pro™
|
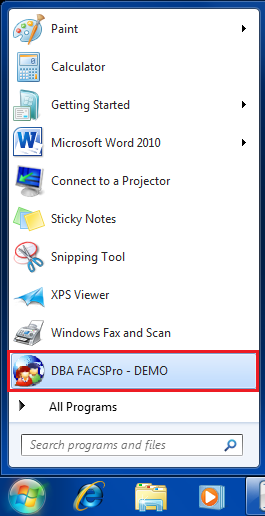
Once installed the DBA FACS Pro™ icon is accessible via the Start Menu. A shortcut can also be made by right clicking on the Icon and selecting Create Shortcut, or by simply dragging the icon onto your desktop. |
Logging In
|
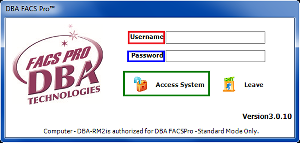
In order to access the DBA FACS Pro™, you must log in by entering your assigned user name and password. Both the user name and password are assigned by the System Administrator. Passwords must meet five criteria to be valid. Hit Enter on the keyboard or click on the Access System icon to launch DBA FACS Pro™. You can close DBA FACS Pro™ by clicking on the Leave Icon, or the Exit Icon once in DBA FACS Pro™. |
Forgotten Password/ Password Reset
|
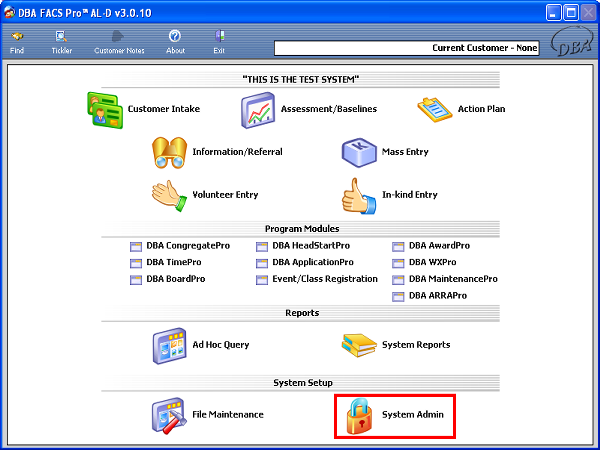
Non full access users who have forgotten their passwords or wish to rest them, need to contact a full access user. To assist the non full access user, you need to click System Admin from the main menu.
If you are a full access user and have forgotten your password or wish to reset it, you need to contact the Help Desk or another full access user. |
|
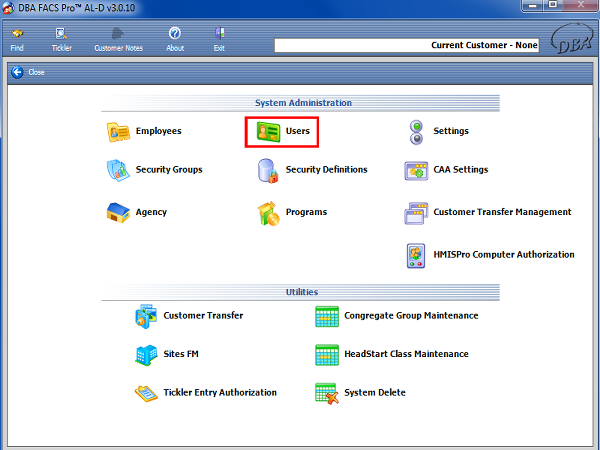
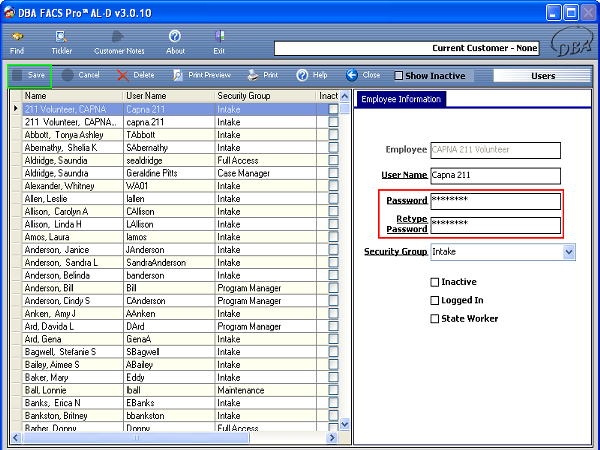
Once this screen has opened, click Users. |
|
Select the non full user and their information will populate the right side of the page. Change the password and retype. Click Save. |
Finding a Customer
|
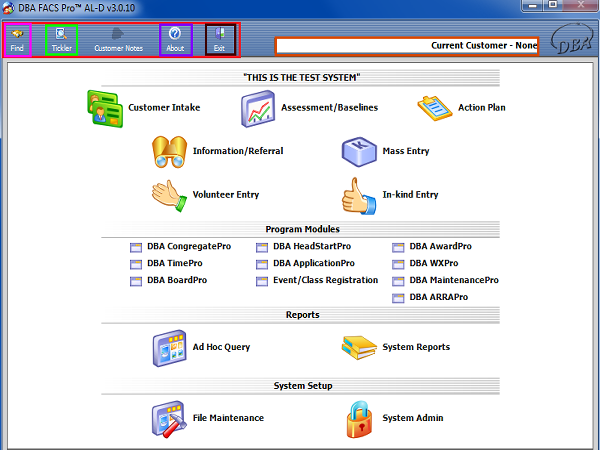
Once logged into the system, the DBA FACS Pro™ main screen appears. This screen is the gateway to the entire functionality of the DBA FACS Pro™ system.
Across the top of the screen is the System Tool Bar (blue background). It includes Icons that allow the user to FIND customers in the system, get HELP with how to use the system, access the user’s TICKLER for reminders on tasks that need to be addressed on a certain date as well as allowing the user to EXIT the DBA FACS Pro™ system at the appropriate time.
Just to the right of the Icons is a field that displays the Current Customer Name after it has been located in the DBA FACS Pro™ system and selected for data entry or modification by the user.
The remainder of the screen presents Icons for all the major functional programs in the system. These are explained individually. |
|
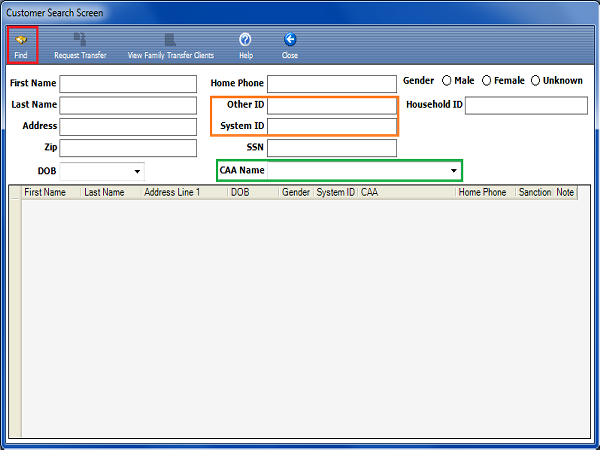
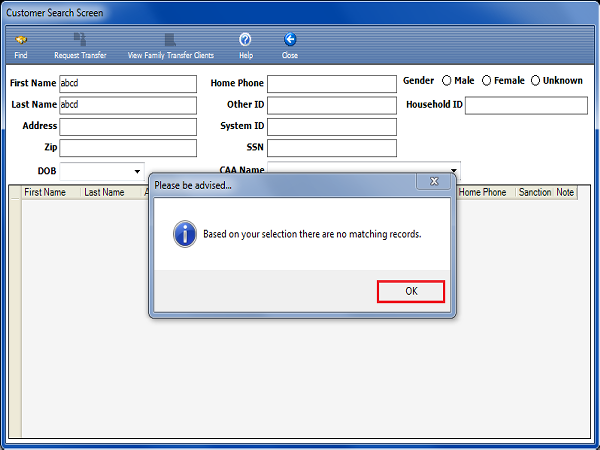
The first step in using DBA FACS Pro™ is to find a customer so that you can create or update information about that individual. Click the Find icon on the System Tool Bar to load the Customer Search Screen.
The Customer Search Screen offers a number of ways to find a customer in the system. You can search by Name, Address, Zip Code (either five digit or five + four digits), Home Phone, or Social Security Number (SSN). More than one field of information can be entered to improve the search results such as First Name and Zip Code. Once the information has been entered, click the Find Icon to see results that match your criteria.
Searching by CAP (Community Action Program) Name can be accomplished by clicking on the drop down arrow to the right of the field and clicking once on a CAP name from the drop down table. You can search by Other ID and System ID only after a customer has already been entered in the system.
TIP:To avoid duplicate records, search using a limited amount of information, such as the first two letters of the first and last name. If your search is too narrow, a warning will appear before the customer can be added. An example of the potential problem is when a customer is entered into DBA FACS Pro™ as Jake instead of Jacob. A search of “Jac” would not find the customer. The preferred approach would be to enter the first two letters of the first name “Ja” to yield first names that could be either Jacob or Jake.
TIP:It is recommended that you do not narrow the field to your agency only. Many agencies cross service areas, and families often move to find a better job or be closer to family. A customer at your door, may have obtained service from another agency using DBA FACS Pro™, and already be in the system.
TIP: You shouldn't search for a customer by SSN# if you aren't sure if they are in the system. This is because the number may have been entered incorrectly by the person that entered it originally which would lead to creating a duplicate customer. |
|
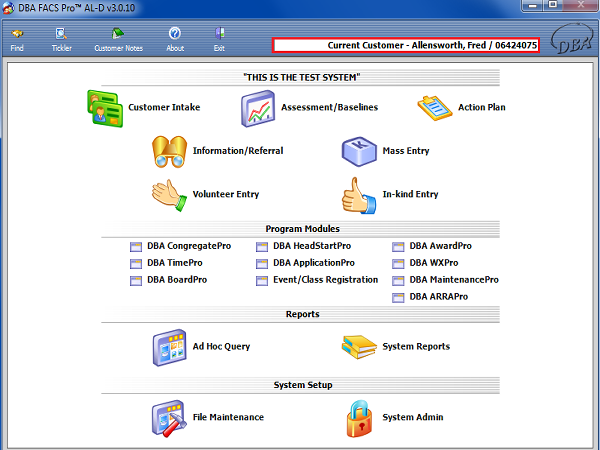
If the customer you are working with appears in the list, double click on his or her name to load the customer. You will be returned to the main screen, and the customer name and system ID will appear at the top of the screen. |
Incomplete Information Warning
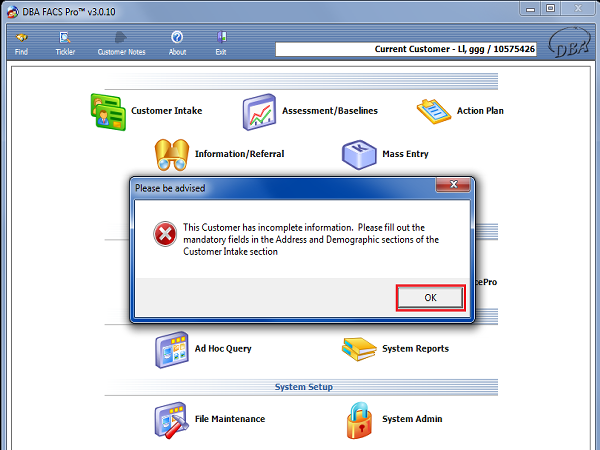
|
If all of the mandatory fields have not been completed, a dialog box appears in the middle of the screen with a message that reminds the user that not all of the mandatory fields in the Address and Demographic screen have been completed. By clicking on OK, the dialog box disappears but the need to find out and enter this information remains as a task for the user to complete. |
Entering a Customer
|
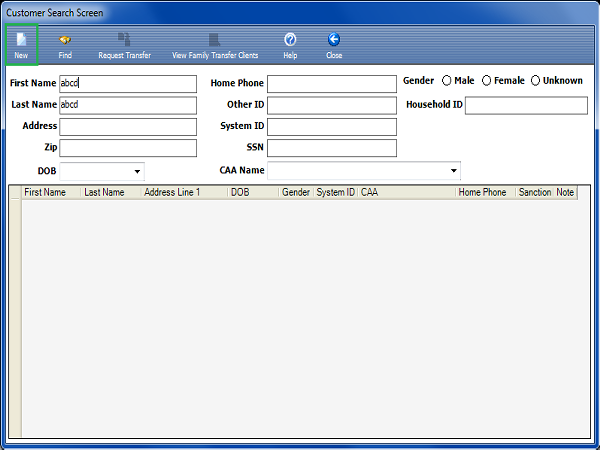
If you wish to add a new customer, you need to search for one first. If they aren't found, then the New button will appear on the toolbar. This will take you to Customer Intake. |
|
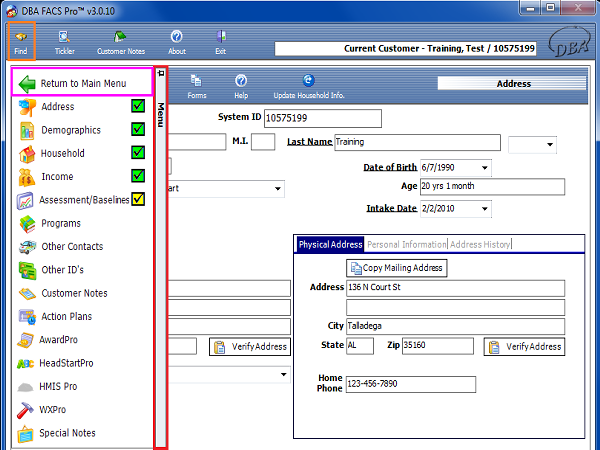
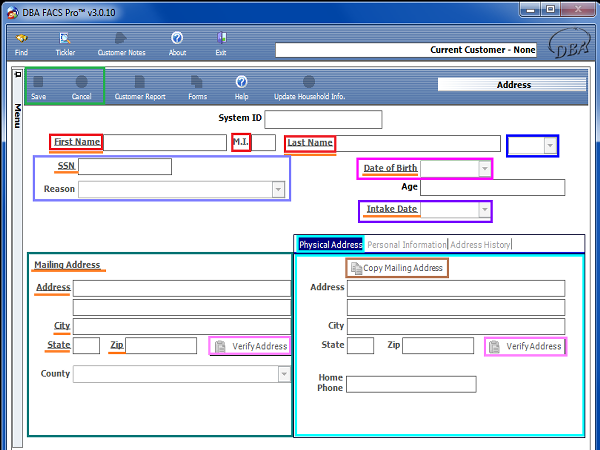
The first screen that appears in the Customer Intake process is the Address Screen. On the left hand side of the screen just below the Find icon is a narrow vertical field with the word Menu printed vertically at the top. Slide your mouse so that the cursor is anywhere over the menu field, and the menu items will appear on the left of the screen.
Each of these Icons represents a screen in the Customer Intake portion of DBA FACS Pro™. Note that at the top of the list is the Return to Main Menu icon which takes the user back to the Main System Menu. |
|
The Address Screen is completed by entering the first name, middle initial, and last name of the customer. There is also a drop down menu for the last name suffix.
Some field descriptions are underlined. This signals that the fields are mandatory and that the information on the screen cannot be saved without the mandatory fields being completed. Additionally, if any field of information is changed on a screen (modified, added, or deleted) the Save and Cancel icons will activate on the top left of the Address Screen tool bar.
Next enter the social security number of the customer. If the social security number is not available, you must choose a reason from the drop down menu below the SSN field.
Enter the date of birth of the customer. The date of birth can be selected from the calendar that appears when you click on the down arrow or the by entering the date using the convention of a two number month, two number day, and four number year. Once that date is selected or entered using the correct date structure (MM/DD/YYYY) the Age of the customer will be automatically calculated.
The next field of entry is the Intake Date. The Intake Date is the date that the customer first came into the Agency and filled out an application. Once again the user can click on the down arrow and activate the Date Control Calendar to click on a date that will automatically fill in the field with the correct date.
The final entries on the Address Screen are the Mailing Address and the Physical Address. If the mailing address and physical address are the same, you can enter the mailing address and then click on the Copy Mailing Address box above the Physical Address field to have the information repeat in the appropriate fields. If the physical address is different then it should be entered in the Physical Address fields on the screen.
When filling in either the Mailing or Physical Address, start by filling in the first 2 lines of the Address and the Zip Code and then hit Verify Address, which will auto fill the City and County if the Address is found.
TIP:You can move on the screen from field to field using either the enter key, the tab key, or by moving the cursor with the mouse to the desired field and clicking on the field. |
Personal Information Screen
|
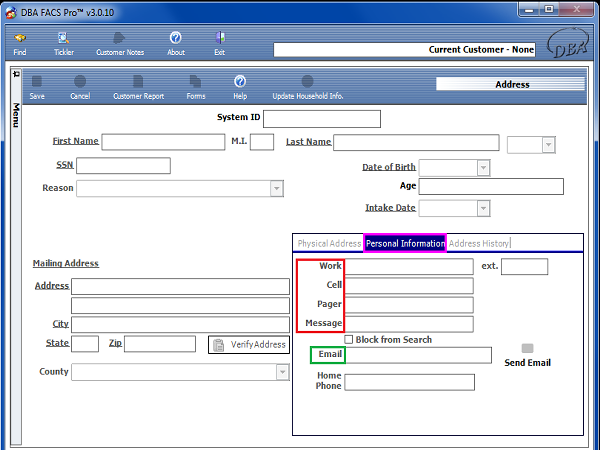
Click the personal information tab next to the physical address tab.
Once selected, this screen appears with selected fields of information carried over from the Address screen. Additional fields to be filled in on this screen include the Work phone number, the Cell phone number, the Pager number, and an alternative phone number where a Message can be left, if applicable.
Ten digit phone numbers can be added without the hyphens between the numbers. When you tab to or hit enter after each field is completed the hyphens will appear at the appropriate position.
Also on this screen the customer e-mail address can be entered. This capability is available when the systems administrator activates this functionality in the user’s system. When activated, you will be able to e-mail the customer appropriate messages from this screen. |
Demographic Information Screen
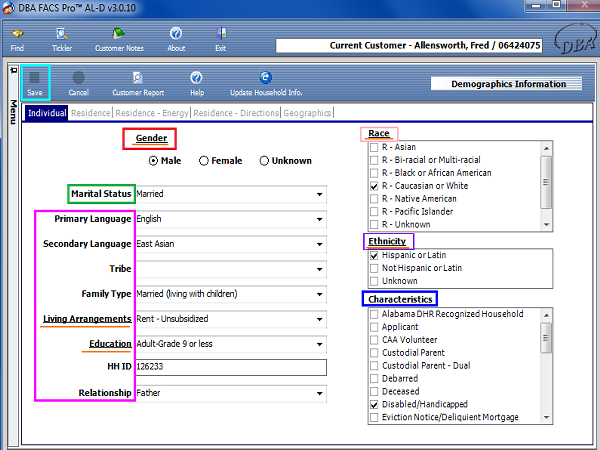
The Demographic Information screen allows the user to enter additional information about the customer.
|
Gender: Click the appropriate circle to indicate whether the customer is Male, Female, or Unknown at the time of the entry. Unknown may be used when information is converted from a previous system where it was not determined or required.
Marital Status:Use the drop down arrow to select a martial status. Only those choices displayed in the drop down table can be selected. Note that there is a blank line above the first entry. The user can click on this line once and the Marital Status fields will be blank. This represents an unknown Marital Status that can result from the transfer of previous data that did not include this information.
The left side of the Demographics Information screen continues with additional fields for Primary Language, Secondary Language, (Indian) Tribe, Family Type, Living Arrangements, Education, and Relationship. All these fields utilize the same functionality of a drop down table. Click once on the most appropriate description on the drop down table to transfer that description to the field. The Household ID (HH ID) field is automatically filled when household members are added.
The underlined fields are mandatory fields that must be filled in with a selection from the drop down table alternatives. You will not be able to save the screen and exit to another screen without completing these fields with the available selections in the drop down tables.
On the right side of the Demographics Information screen are three tables.
The first table is for Race. Not all of the available selections of race description are visible on the screen. The user needs to slide the cursor over to the vertical scroll bar, left click the mouse and hold down the click down to make other parts of the table visible for selection. Once the right description is visible then a single mouse click in the accompanying box will complete the selection.
The second table is for Ethnicity.
The third table on the right of the screen is for Characteristics of the customer. More than one can be selected. The contents of the screen can be saved at any time during data entry as long as the mandatory fields have been completed. |
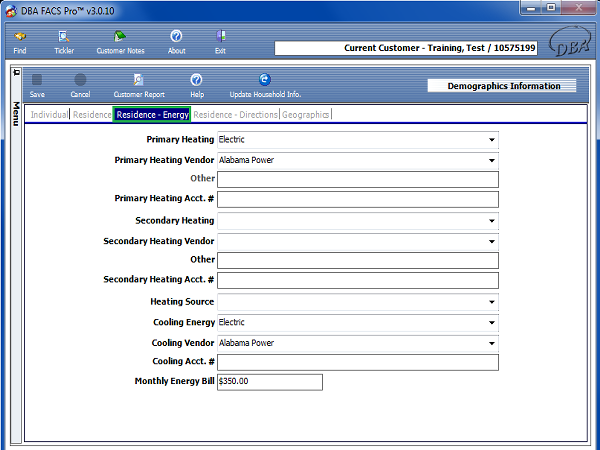
Residence
|
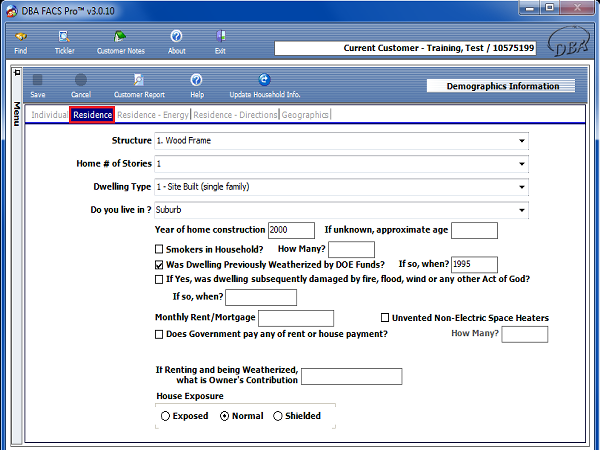
The two Residence Screens can be accessed by clicking each of the Residence tabs. The Residence tab mostly relates to the Weatherization Assistance Program while the Residence- Energy tab mostly relates to LIHEAP;however, any information that is known should be filled in no matter what program you are dealing with. |
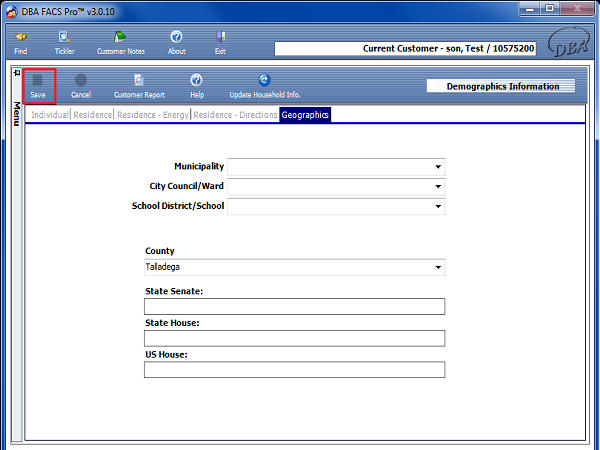
Geographic Information Screen
|
The Geographic Information screen allows you to identify the political subdivisions that the customer is associated with by his residency status. This information is used primarily for reporting.
The categories on this screen are Municipality, City Council/Ward (if applicable), School District/School, County, State Senate, State House, and US House.
Some of these fields have pull down table arrows at the end of the fields. DBA FACS Pro™ has been structured to provide tables in other areas of the system to build the selections for each category. By clicking on the pull down table arrow, you can select the applicable name by clicking once on the correct selection. When all desired information has been selected the information is saved by clicking on the Save icon before exiting the screen. |
Household
|
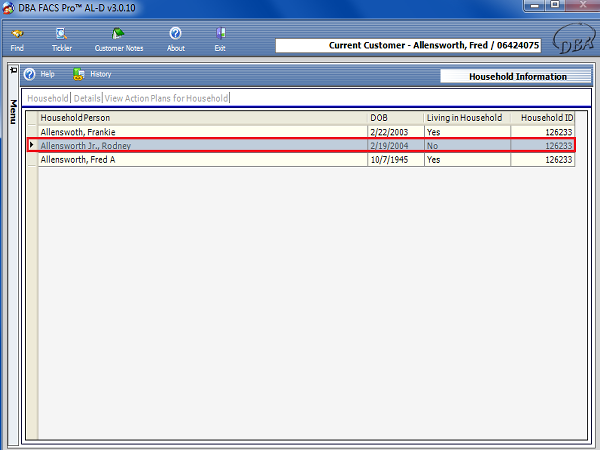
The Household Information screen allows you to enter information about individuals residing in the same household or who are related to the customer. The main screen provides a list of the people who have been entered and associated with the customer. Double click on a name to view information about that individual in the Details screen. To enter a new household member, you must first search for the customer, using the Find button in the toolbar. If the household member has already been entered, double click on the individual’s name in the search results grid, and the information will automatically populate in the Household Screen.
If a customer is already in the household, they won't show up as a choice when searching. Also, if you search for a customer to add to the family and they aren't found, you can enter them by hitting the new button on the Find screen. This will allow you to enter the customer through the Household screen and any demographic information that relates to the entire household will be copied over from the Head of Household. This will only happen if Living in Household is checked off. |
|
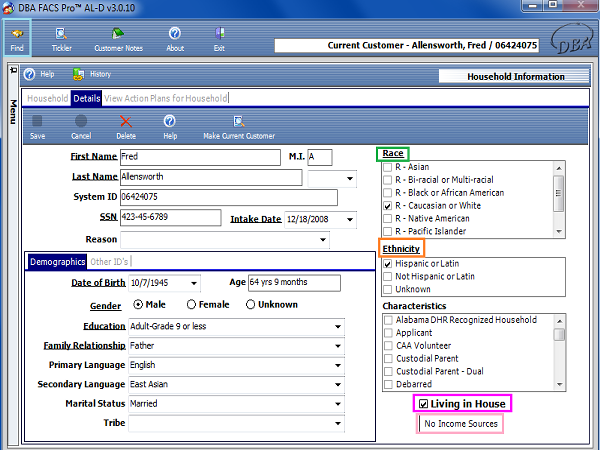
This screen contains a number of mandatory fields that must be completed before the information on the screen can be saved. Most of the fields should already be filled out based on previous screens.
On the right side of the screen there are three boxes of information that should be completed. The lists for Race and Ethnicity are mandatory so a choice in this box must be selected so that all information can be saved. The choices appear in the screen once a new household member is entered. Click the box once to enter a check mark.
If any characteristics in the box below are appropriate, move the cursor to the box and click once. More than one box may be selected. Finally, at the bottom of the screen, there are two additional boxes. If the individual is living in the house, or has No Income Sources, enter a check mark in the appropriate box. |
|
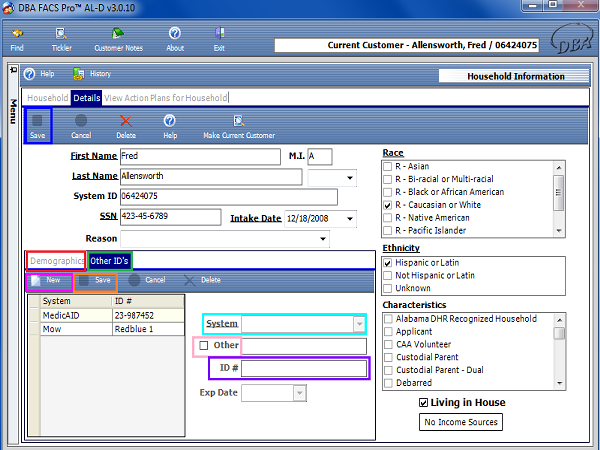
The lower left portion of the screen will appear with the information from the Demographics tab visible. Click on the Other ID’s tab, and a different view fills the box. When you click on the New Icon on the toolbar for this box, the right side of the box activates. The Other ID Tab holds additional information about the customer, such as Driver’s License, program identification numbers, and other identifying numbers. Click Save on the lower toolbar to save the ID information.
The System field is mandatory. Click the drop down box arrow to activate the selection grid. Scroll up and down the listing to select each system name that is appropriate. Click once on the preferred system description and the system name will appear in the field.
If the identification type that the user is trying to input into DBA FACS Pro™ is not visible in the table, click on the Other box and enter the name of the system and the related identification (ID) number in the field below. Click on the Save icon at the top of that section and the data for System and System ID will appear in the list for this individual.
Click Save on the middle toolbar. |
|
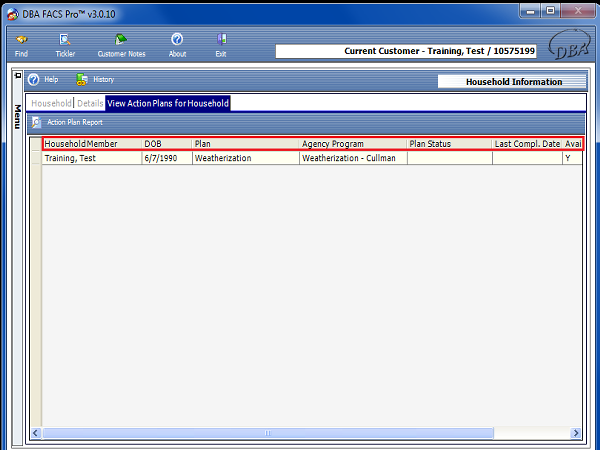
The View Action Plans for Household tab at the top of the screen allows you to view all the action plans that have been initiated for each household member. The name of the Household Member, Plan, Dimension, Case Worker, Estimated Completion Date and Actual Completion Date are displayed. This information is entered elsewhere in the system and is made visible here for purposes of identifying the programs, services and interventions for an entire household. Action Plans are accessible from this grid if you have been granted access rights to that particular Action Plan. |
|
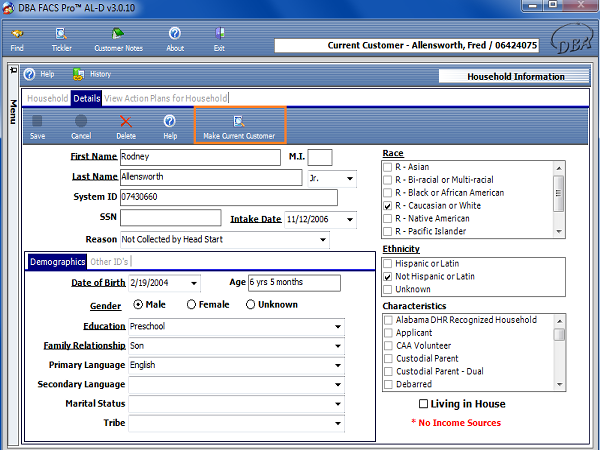
The Make Current Customer Icon allows you to switch between household members files, in order to make corrections, add Action Plans, and view household data. To switch to another household member’s record, select that customer in the Household grid. Once that household members information appears in the Details Screen, click the Make Current Customer icon. The name of the new Household member will be displayed in the top toolbar as the Current Customer. |
|
REMINDER:When entering a new household member through the Household screen, only the information entered on the household screen, and shared family information (address, phone number, etc.) will be transferred to the new household member’s file. You must make the new member the current customer, and then proceed to enter the additional information, such as Marital Status, Primary Language, Income, etc. This is a necessary step if the household member is also receiving a service. |
Other Contact Screen
|
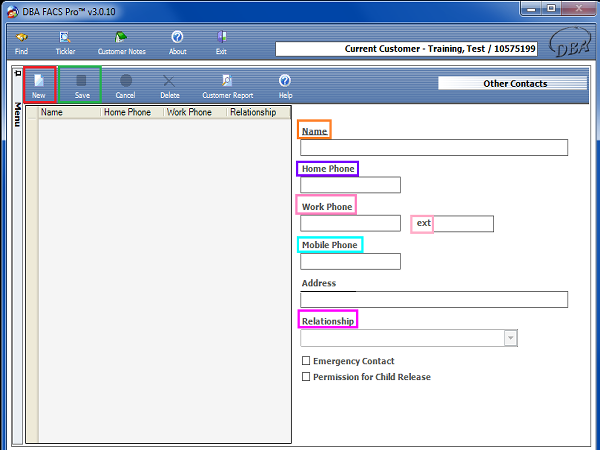
The Other Contact screen allows you to list an unlimited number of emergency contacts for each customer. To begin to develop the list, click on the New icon. This will activate the fields for Name, Home Phone, Work Phone with Extension, Mobile Phone and Relationship. You must select a pre-defined Relationship from the pull down table. A single click on the correct table line item will populate the field. Because the list is longer than the visible portion of the table, use the scroll bar on the right side of the table to scroll up and down the table.
When you finish entering the information in the fields provided, click the Save icon (found beside New Icon). This will insert the main information into the list on the left of the screen for future reference. This list will show the name, home phone, work phone, and relationship information for all emergency contacts entered into DBA FACS Pro™ for this customer. |
Income Screen
|
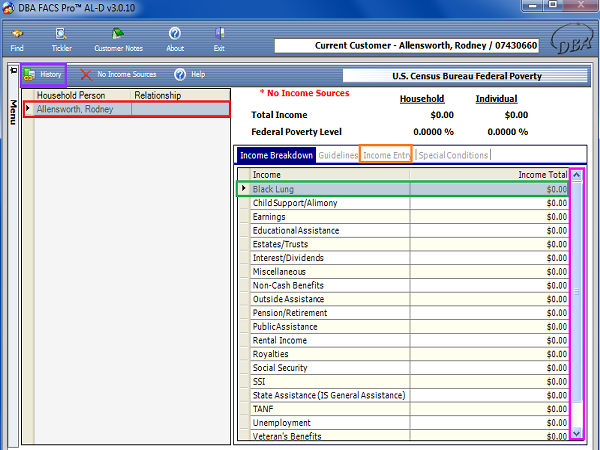
The Income screen provides you with information about the customer’s income as provided during initial intake. The screen that appears initially presents the summary of the information provided. Information for everyone listed on the left side of the screen is viewed individually by clicking once on the name of each person. The selected name will be highlighted in blue and the Income information for the customer will be visible on the right side of the screen. To see all lines of potential income sources, scroll up and down the list by clicking on the up and down arrows to the right of the list. To enter income information, click twice on the income category line item you want to enter. Just clicking the Income Entry Tab will produce a warning that you must first chose an Income Category. |
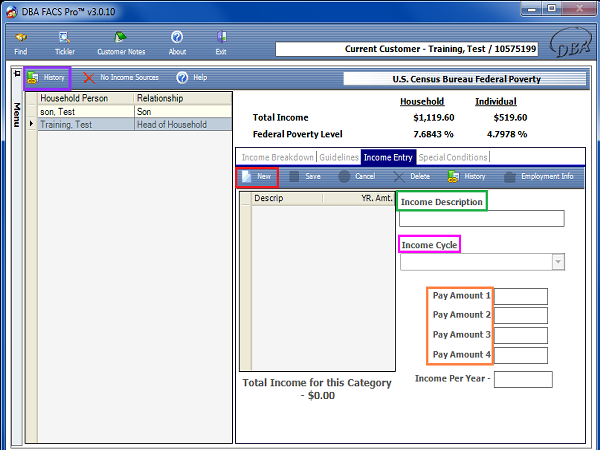
|
On this screen click on the New icon and the fields for data entry become active. In the first field labeled Income Description, enter a description of the income category, such as type of job, name of workplace, or simply “Employment.” The next entry is a pull down table for Income Cycle, meaning how frequently the customer receives this source of income. Select the appropriate frequency and then enter the amount received with each payment. DBA FACS Pro™ automatically calculates the annual value of the payment and frequency entered previously and records that amount on the left of this screen. If you chose a frequency that occurs more than once, multiple “Pay Amount” boxes will appear. Save this information and DBA FACS Pro™ shows the annual amount on the Income Breakdown screen also. Repeat this activity for each source of income until all sources of income have been entered.
This information should be collected for each customer living in the same household. This allows DBA FACS Pro™ to calculate and display in the upper right hand corner of this screen both the percentage of household and individual income relative to the Federal Poverty Level.
TIP:You must enter the pay amount in all boxes, even if the amount is identical each pay, for the Income Per Year Amount to calculate correctly.
TIP:Use the Income Description to enter the place of employment for the individual.
REMINDER:The Income is calculated based on a federal formula that takes into consideration the number of payments received. For example, bi-weekly pays, or every other week, is actually 26 pays, not 24. |
|
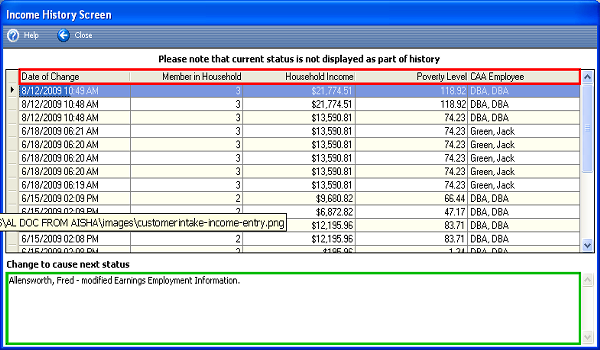
By clicking on the History Icon near the top left of the Income screen, you can view the income history table. This screen shows the Date (of Change) income information was added, the number of Household Members, the Total Household income recorded, the applicable Poverty Level amount at the time of information entry, and the name of the Employee who entered the information. This screen also provides a text field at the bottom of the screen that shows what income was changed to cause this history record to be added. |
Other ID's Screen
|
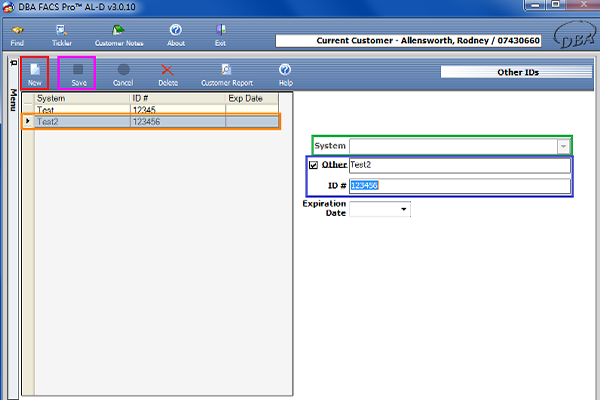
DBA FACS Pro™ provides the capability to record Other ID’s (Identification) numbers that the customer is associated with. The Other's ID can be entered on the Find Customer screen as another way to look for a customer in the system. To enter this information into this screen, click on the New icon at the left of the screen tool bar. This activates the fields in the right side of the screen. The System Name table includes a pre-defined list of other sources of identification numbers. Click on the pull down table arrow to make the table visible. This field and pull down table can be activated as many times as there are System Names. There are also two fields for Other System Names and identification numbers that are not included in the pull down table.
To enter a System other than those in the pull down table, click on the New icon, click on the box marked Other, and then enter the name of the Other System. Once the name of the system has been entered, tab to the ID Number field and enter the associated ID number. Once that entry, or any entry on this screen, has been saved, the System and ID number will appear in the table on the left side of the screen.
To edit or change either existing System Names or ID Numbers, click once on the System Name and the information will re-appear on the right side of the screen. Make the necessary changes and save the new data. The updated information will again appear on the left side of the screen. |
Programs Screen
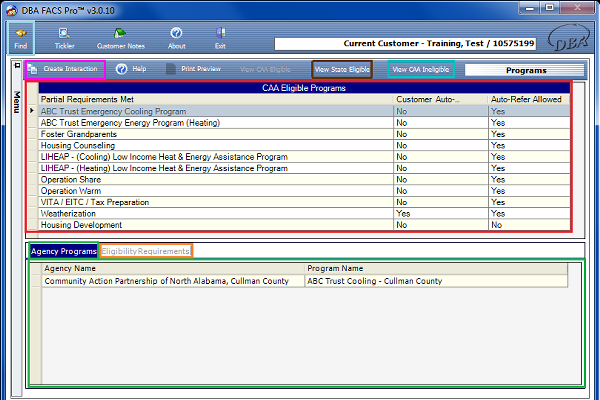
|
The Programs screen presents the results of actions taken elsewhere in DBA FACS Pro™. This screen shows the support programs that the customer is qualified to participate in, an overview of the requirements guidelines, and the list of agencies that can help the customer for these specific programs.
The three areas of this screen are the following:
Programs– the block on the top part of the screen lists the programs that the customer/client has been pre-qualified for during a meeting with an Agency staff member.
Agency/Program– the left tab on the bottom of the screen shows all of the Agencies and their program names to which the customer can be connected for assistance.
Eligibility Requirements– the right tab on the bottom of the screen shows a summary of the basis for qualification.
To enroll the Customer into the Program, click the Create Interaction button. A screen will come up where the user can choose the Agency Program to enroll them in and the Action Plan template to create.
The View State Eligible button will show programs that the Customer is eligible for throughout the state, but not at the current Agency. The View CAA Ineligible button shows all Programs at the current Agency that the customer isn't eligible for. |
Notes Screen
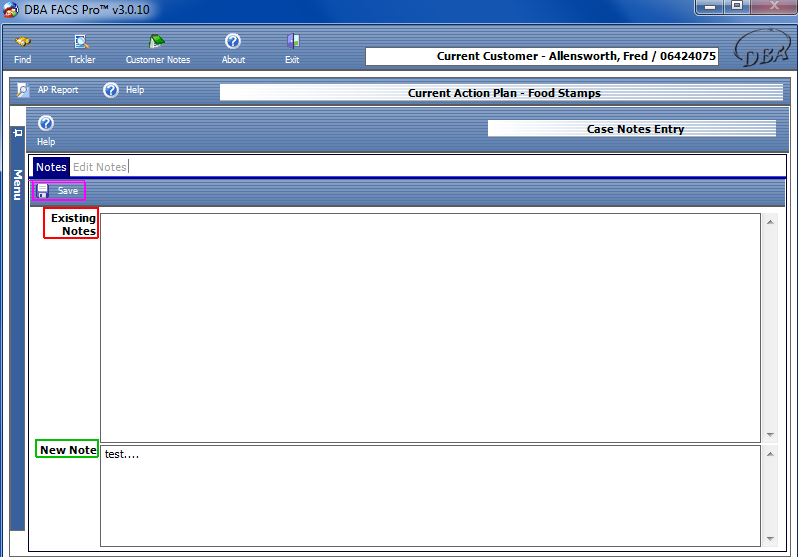
|
The Notes screen is where Existing Notes may be viewed and New Notes added. To add a New Note, simply begin typing in the bottom box, labeled ‘New Note’, and click the Save Icon when you are done. This will add the New Note under Existing Notes.
Remember, these notes may be viewed by all other users in the system. Do NOT enter confidential or personal information in this section. |
Printing the completed Client Intake Report
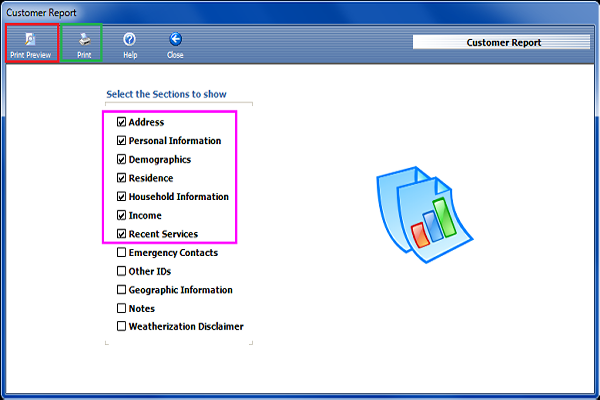
|
From the toolbar at the top of the Address screen, you can click on the Client Report Icon. This screen (shown above) allows you to have DBA FACS Pro™ prepare reports based on any of the report titles presented on the screen.
Checking off one or more boxes will generate a report that includes the information from the DBA FACS Pro™ database for that topic. Once the appropriate boxes have been checked off, click on the Print Preview Icon on the left of the toolbar to generate a report. The report is visible in an Adobe Acrobat format, and is able to be printed or saved.
To print the report, click on the printer icon on the upper left toolbar for the print preview screen, then click Print. |